The File and Folder views
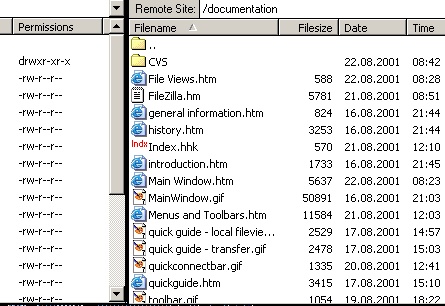
The file and folder view of the remote site is located on the right side of the main window. With it you can navigate on an FTP server and initiate downloads.
The file and folder list
Each line represents a file or folder. The file and folder icons help you to identify the files and folders quickly. The labels above each column describe their meaning. The meaning of the first 4 columns should be clear: Filename, Filesize, Date and Time. The last column entitled "Permissions" tells you what access rights you have on the files. You don't really have to care about the permissions. The first character indicates whether the entry is a file, a directory or a link. The last characters are three groups of three characters each. The first group describes the owner rights, the second the group rights and the last one the public rights. An r means that you have read access, w means write access and x means the right to execute a file. You can sort the list by clicking on one of the column labels. A small gray arrow indicates which column the list is sorted on and the sort direction. You can toggle the sort direction by clicking the heading again.
You can change the style of the list and the visible columns with the menu of the main window.
Navigating on the server
On the upper side you will notice the combo box. Here the current folder is listed. You can also enter a new folder. Press enter and FileZilla switches to this folder. You can also click on the arrow on the right to open a popup menu containing a list of all directories you've visited on that server. Click on an item to switch to that directory.

Below that is the file and folder list. The first entry in the list is always "..". It represents the parent folder of the current folder. You can switch to a folder by double clicking it or by using the context menu.
Downloading files
There are three ways to download a file: You can double click it, you can use the context menu or you can drag and drop the file into the local file list. You can operate on a folder in the same way. You may also select multiple files and folders for transfer in one operation, except of course double-clicking is not available in this situation. To add items to the queue for a later transfer, you may again use the context menu or you can drag and drop them into the queue.
The context menu
Right-click the file and folder list to display the context menu.
|
Download |
- |
Downloads the selected files and folders. The download starts immediately. |
|
Add to Queue |
- |
Adds all selected items to the transfer queue. Use the
|
|
Download as |
- |
Asks you for a username and password that will be used to download the selected files and folders. |
|
Open |
- |
Opens the selected directory. |
|
View/Edit |
- |
When using this command, FileZilla downloads the selected file into a temporary folder. Then it opens the file with the file viewer/editor you've set in the settings dialog. When you've closed the viewer/editor and the file has changed, FileZilla will ask you if you want to upload the file back to the server. |
|
Create Directory |
- |
Creates a new directory in the current folder. You have to enter a name for the new folder before it will be created. |
|
Delete |
- |
Removes all selected files and folders. You will be asked for confirmation. |
|
Rename |
- |
Renames the selected file. You'll be asked for the new name. |
|
File attributes |
- |
Allows you to change the attributes of the selected file. This function is not supported by all FTP servers. |
The file and folder view of the local site is located on the left side of the main window. With it you can navigate on your local machine and initiate uploads.
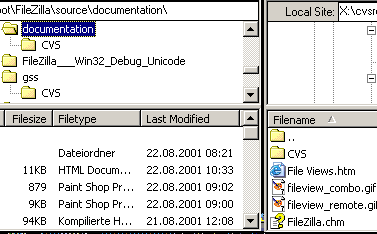
The file and folder list
The local file and folder list is very similar to the remote file and folder list. The labels above each column describe their meaning. Again you can sort the list and the small gray arrow indicates which column the list is sorted on and the sort direction.
You can change the style of the list and the visible columns with the menu of the main window.
Navigating on the local site
On the upper side you will notice an edit field. Here the current folder is listed. You can also enter a new folder. Press enter and FileZilla switches to this folder.
Below that is a treeview. It displays the
folder structure of your machine. The current folder is always selected. Select
another item to switch to that folder. The treeview can be toggled using the ![]() button on the toolbar.
button on the toolbar.
On the bottom there finally is the file and folder list. The first entry in the list is always "..". It represents the parent folder of the current folder. You can switch to a folder by double clicking it or by using the context menu.
Uploading files
There are three ways to upload a file: You can double click it, you can use the context menu or you can drag and drop the file into the remote file list. You can operate on a folder in the same way. You may also select multiple files and folders for transfer in one operation, except of course double-clicking is not available in this situation. To add items to the queue for a later transfer, you may again use the context menu or you can drag and drop them into the queue.
The context menu
Right-click the file and folder list to display the context menu.
|
Upload |
- |
Uploads the selected files and folders. The upload starts immediately. |
|
Add to Queue |
- |
Adds all selected items to the transfer queue. Use the
|
|
Upload as |
- |
Asks you for a username and password that will be used to upload the selected files and folders. |
|
Open |
- |
If you've selected a directory, FileZilla switches to that directory. If you've selected a file, it will be opened with its associated application. |
|
View/Edit |
- |
Opens the selected file with the file viewer/editor specified in the settings dialog. |
|
Create Directory |
- |
Creates a new directory in the current folder. You have to enter a name for the new folder before it will be created. |
|
Delete |
- |
Removes all selected files and folders. You will be asked for confirmation. |
|
Rename |
- |
Renames the selected file. You'll be asked for the new name. |
3. Shortcuts
F5 - refreshes both file lists
CTRL + A - Select all files in the current file list.
DEL - Delete all selected files and folders. Deleted files will be moved to the recycle bin
SHIFT + DEL - Delete all selected files and folders. Deleted files will be erased and not moved to the recycle bin.